Sunday, November 11, 2012

My Veggie Patch!


I am disproportionately excited about this, but... I have a vegetable garden!  After two years of scraping by on a few herbs picked from the balcony, I can start to grow normal-sized things again.  Well, one or two normal-sized things.  It's 1.2 metres square.


IMG_3079
 

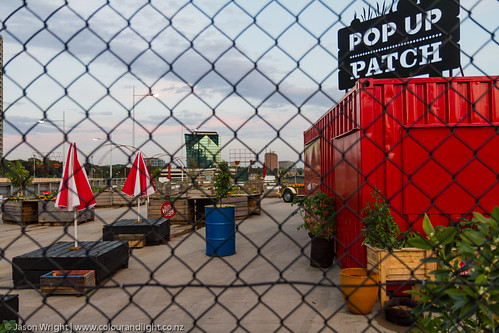
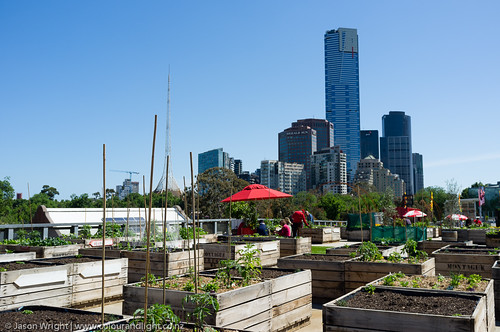
The Little Veggie Patch Co. have created a Pop-Up Patch in the middle of Melbourne, and I love them for it.

IMG_3088

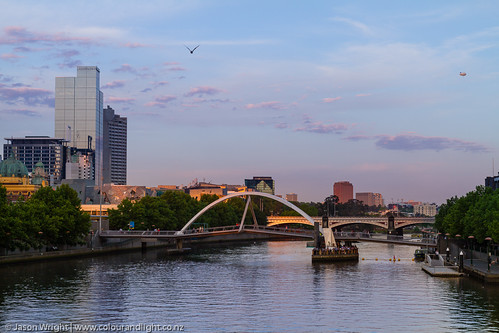
Just past Flinders Street Station, tucked in the back of the carpark in Federation Square...


Are a bunch of recycled apple crates.  But they are much more than just boxes of dirt, they are a focal point for a bunch of like-minded individuals who want a quiet spot in the middle of the noise to hang out, have a picnic, and get their hands dirty. 
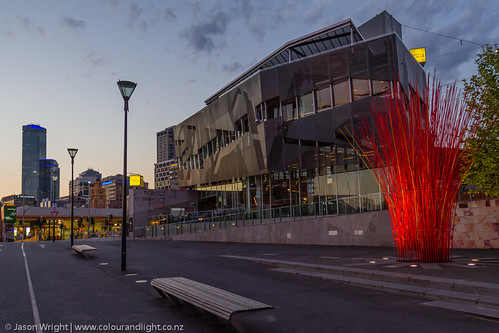
There are city views out one side, and the river and Botanical gardens out the other.  At the far end I can see the MCG (Melbourne Cricket Ground).

DSCF0033

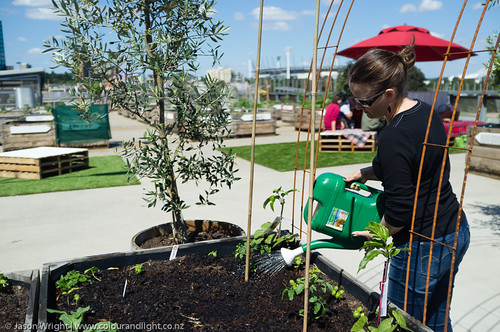
It makes me smile because I'm really growing things for the first time in AGES.  I planted seeds.  And I walk down to water them, and really just to see if they are up yet!  I know, I'm easily pleased.

DSCF0027

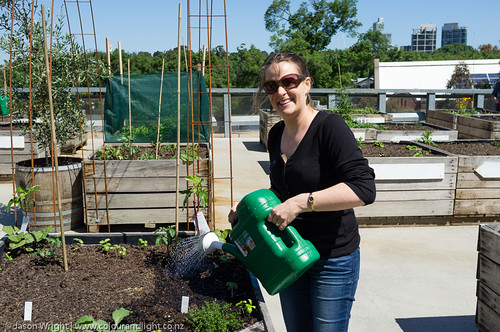
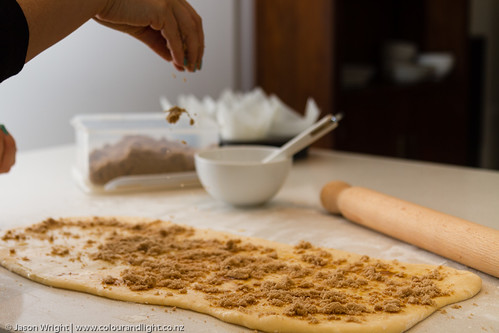
Everything I need is there - water, tools, advice - and I get a bunch of seeds and seedlings each season to choose from and plant.  My spot came with runner beans and passionfruit (win!) plus oregano and thyme, but I've also planted cherry tomatoes, basil, borage, eggplant, and watermelon.  I have corn ordered (they were out they day I set up), and a real tomato plant to pop in this week (Thanks Wendy & Toby!)

DSCF0030   

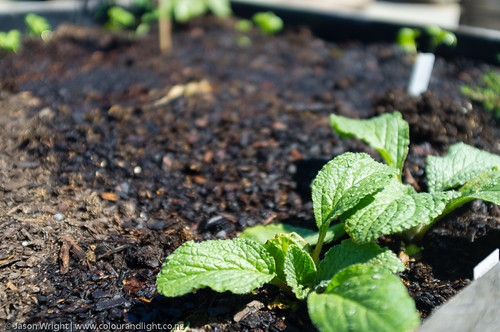
..but mostly, I have dirt with green things in it!

DSCF0029   

..and a pretty nice walk home.

IMG_3076   

Saturday, July 14, 2012

Baked Custard

I don't often make dessert unless we have people over for dinner.  Other than consideration for my waistline, this is normally for reasons of scale - it is just too hard to find recipes for two people, or recipes which don't require a considerable effort.  Usual standbys are icecream, Spanish hot chocolate, or store-bought dessert cups (tiramisu, and "Gu" ganache are favourites in the latter category).

But finally, I have a quick and easy dessert, designed for two but easy to scale for more.  And easy to dress up and modify for a change of flavour.

Baked Custard

Baked custard takes about 40 minutes including cooking time - but only 5 minutes to prep, so you can relax and enjoy a glass of wine while it cooks. Here, I've added raspberries to make this a little more interesting to share with friends - but it's equally delicious on its own, with a side of poached or fresh fruit, or with a sauce in the bottom of the cup.  It can be served warm or cold, keeping in the fridge for a couple of days.

Baked Custard

I've made this for four here (which is why you see two eggs, and four ramekins), but the beauty is that to make this for two people you need one egg (this being the part of most recipes that is near impossible to scale down!)

For two serves:
Beat one egg.
Add 3/4 cup of milk, 1/4 cup of sugar (or substitute all or part for maple syrup!), and 1 tsp vanilla essence. 
Mix until sugar has dissolved.

Double the quantities for four people (you knew that, right?), but the cooking time will be the same.

Baked Custard

Divide the mixture into small ramekins (no need to grease these), or bake in a single dish (allow for a little extra cooking time).

Baked Custard

Place the ramekins in a deep oven-proof dish, and add hot water.  The water should reach at least halfway up the sides of the ramekins (preferably the same level as the custard).

Baked Custard

Bake in a 180C oven for 35 minutes.  The custard should be set at the sides, but still slightly wobbly in the middle.
Remove from the oven and carefully remove the ramekins (I use gloves).  Rest on a wire rack until you can comfortably touch the edges of the ramekins, then dive in with a spoon.  Or, if you are planning to eat cold, cover with plastic wrap and refrigerate immediately.

Sunday, July 8, 2012

Hello, July! (It's Truffle Season.)

If you follow me on Facebook or Twitter you already know I'm excited.  July is the big month for Southern Hemisphere truffles, and I think I was born in July for this exact reason.  What do I want for my birthday?  Truffles, please!  Rubies are out (I was never really convinced about them), and truffle is officially my new birth stone.
Well, they do kind of look like rocks.

Truffle pasta

We celebrated the start of the season by popping in to visit the Madame, and picked up a little 13g Tasmanian treat.  Good friends were coming for dinner, and we wanted to surprise them.

To kick off the season, we served a small entree of fresh pasta (only homemade will do in this case) with butter, and grated truffle on top while it was still hot:


Truffle pasta 

I love the way the tendrils of shaved truffle cling to the microplane - it needs a couple of sharp taps against the edge of the bowl from time to time.
The heat releases the smell from the truffle, and much time was spent savouring the smell before we remembered to eat!


Truffle pasta

Truffle pasta

Buttered bread helped us to clean our bowls and to finish off every last crumb of truffle!

Truffle pasta


We will return for more in coming weeks - and promise to share.

Tuesday, July 3, 2012

REAL Maple syrup!

IMG_2547 

We flew home to NZ recently to visit family, and my beautiful sister Kerryn picked up some maple syrup on her way through Canada for me.

There is no substitute for real maple syrup.  That is, syrup that comes from a treeIn Canada. No artificial flavourings here.


Things I could use real maple syrup for:
  • pouring over crepes or pancakes
  • pouring on porridge in place of brown sugar
  • a fine coating on carrots before roasting
  • a fine coating on Brussels sprouts before coating (Kerryn insists that I'll never go back to my version)
  • glazing ham
  • drinking straight from the bottle

Saturday, June 30, 2012

Shanks very much

...Sorry, I inherited my father's sense of humour.  He is very punny.

My local butcher was offering wallaby shanks last week, and I couldn't resist.  He agreed that they are similar to kangaroo, being very lean, but less "gamey" in flavour.

IMG_2558

The following is the same technique I use for lamb shanks, without any adjustments for time (the shanks were about the same size).  If anything, they were a little dry (being so lean), and if I try this again I would probably prefer to cook them in a sauce or something to retain moisture.

And the conclusion?  Not bad, but they lacked the sweetness of lamb - nice for a change, but I have not been converted!

IMG_2545 


The deep colour of the meat definitely reminded me of kangaroo!


IMG_2544


Vegetables add sweetness, and moisture while cooking.  I also halved a couple of garlic cloves lengthways.


IMG_2548

Sear the shanks and set aside.  Brown sliced vegetables in a teaspoon of butter, or a little streaky bacon (or both!) - just to kick off the caramelisation.


IMG_2551 to 

Place the shanks on top of the vegetables, and add a tablespoon of red wine or port.
Cover, and cook for 2-3 hours at 180C (drop the dial back for the last hour if you are going for three hours - I left it at 160C for the last hour)


IMG_2559

IMG_2571


IMG_2576

Serve with Puy Lentils and green vegetables (and the veges from the pan, they are delicious!)  Pour over any juices which are left in the pan.

Thursday, June 28, 2012

My favourite things: Georgie's Garlic


IMG_2542  

There is a stall* at the South Melbourne Market which has a fantastic range of potatoes and other root vegetables (onions, heirloom carrots...)   The staff are always friendly, and more than happy to offer advice on which kind of potato you need for the purpose you have in mind!
But my favourite thing is the garlic.  They peel off the outer layers so that you can see exactly what you are buying - big cloves, small cloves, or a bit of a mix - instead of waiting til you get home and finding it's the opposite of what you hoped for.  Such a simple thing to do, but it makes me smile every week.

*  OK, I looked it up because I know you can't just read my mind.  It's Georgie's Harvest Potatoes & Herbs, Stall 50 - you would find it outside, on Coventry Street, if you were so inclined.


Saturday, June 23, 2012

Brioche scrolls

Once you know how to make bread, and then learn that adding eggs makes brioche, the world is your oyster.

blueberry brioche

Brioche scrolls are my favourite food in the baking/muffins category.  They are good cold, but better warm - and they reheat well, making them a great option to take to visit a friend.  If you think you can share them, that is.

And making them is easy!  Just make brioche, and roll out to a rectangle after the first rising.  Brush with egg,  sprinkle generously with brown sugar and berries (or dark chocolate - YUM!  Cut, and allow to rise again.
Brush the tops with egg - and sprinkle the tops with sugar if you want a bit of glaze (I always forget).
Bake at 190C for about 25 minutes.

blueberry brioche
blueberry brioche
blueberry brioche
blueberry brioche
blueberry brioche
blueberry brioche
blueberry brioche
blueberry brioche
blueberry brioche

Sunday, April 8, 2012

Brioche is just bread with eggs in it

...and a little butter, too.

IMG_2391

We went out for lunch last week, and ordered a couple of fabulous salads which we enjoyed a great deal.  Unfortunately, the man at the table next to us had a burger, on a toasted brioche bun, with fries that smelled amazing.
When I asked Jason what he wanted for dinner the next day, it was no surprise that he requested burgers.  With brioche.

 IMG_2379

You know the bread ratio by now.  5  parts flour, three parts liquid.  Well, here we just substitute some of our "liquid" ratio with eggs.
For a 2-cup flour recipe, I add one egg plus an extra yolk (freeze the whites and then defrost to add to an omelette later if you don't need them straight away), and reduce the water or milk accordingly.  I also add about 50g of softened butter.


IMG_2382

The resulting dough is soft, airy, and a dream to knead.  After the dough rises you can see large, long air pockets (rather than th esmaller bubbles you normally see).

 IMG_2384

The finished bread is rich, slightly yellow in colour, and toasts to a beautiful golden colour (I didn't toast this as it was just so fresh!)

 IMG_2387

Load up with your favourite fillings (hummus, chicken thighs, bacon, avocado...)


IMG_2388
 

Monday, March 26, 2012

Hot Cross Buns are really just bread

IMG_2346

Once you know the basic bread ratio, you can play around with it.  I've waited until we are suitably close to Easter to share this one with you.
Yes, I'm one of those people who complains when Easter eggs and Hot Cross buns roll onto supermarket shelves immediately after Christmas - which immediately follows Halloween.  I think that some things are special because we wait all year for them, so eating Hot Cross buns in January is cheating.  And besides, they're better suited to the cooler Autumn weather!

IMG_2332

To make six buns, use 2-cups of flour and the bread ratio (follow the link above for bread 101), and add 2 teaspoons of brown sugar, 1 teaspoon of cinnamon, and half a teaspoon each of mixed spice and nutmeg.  Then throw in a couple of handfuls of raisins, and other dried fruit.  I abhor peel, which is one of the reasons I make my own buns - but add that too if you must.

I like my rolls to join together just a little bit, so I place them 1-2cm apart.  Any closer and you'll get more of a loaf (which easily tears into portions), much like many store-bought buns, but you'll need to increase the cooking time.

IMG_2340

After the second rising,  pipe crosses onto your buns - you just need a simple paste of flour and water (mix to piping consistency - a couple of tablespoons of cold water to a quarter of a cup of flour).

IMG_2345

Place immediately into a hot oven (180C for 10-12 minutes)

IMG_2346

Finish with butter and jam

IMG_2353
.. and it is important that you consume these immediately.  While they are still hot.  So that the butter melts, and runs down your chin.

IMG_2357